Stand-up and flat bottom pouches can hold many of the same dry products, but they do not behave the same after filling. Base geometry, product density, shelf presentation, laminate construction and filling conditions all affect the result.
A stand-up pouch is often the more efficient option. A flat bottom pouch provides a broader, carton-like base and additional printable panels. The better format is the one that fits the product and production process without unnecessary complexity.
This comparison focuses on the package buyers ultimately approve: filled, sealed and presented under realistic handling and shelf conditions.
How Do Stand-Up and Flat Bottom Pouch Structures Differ?
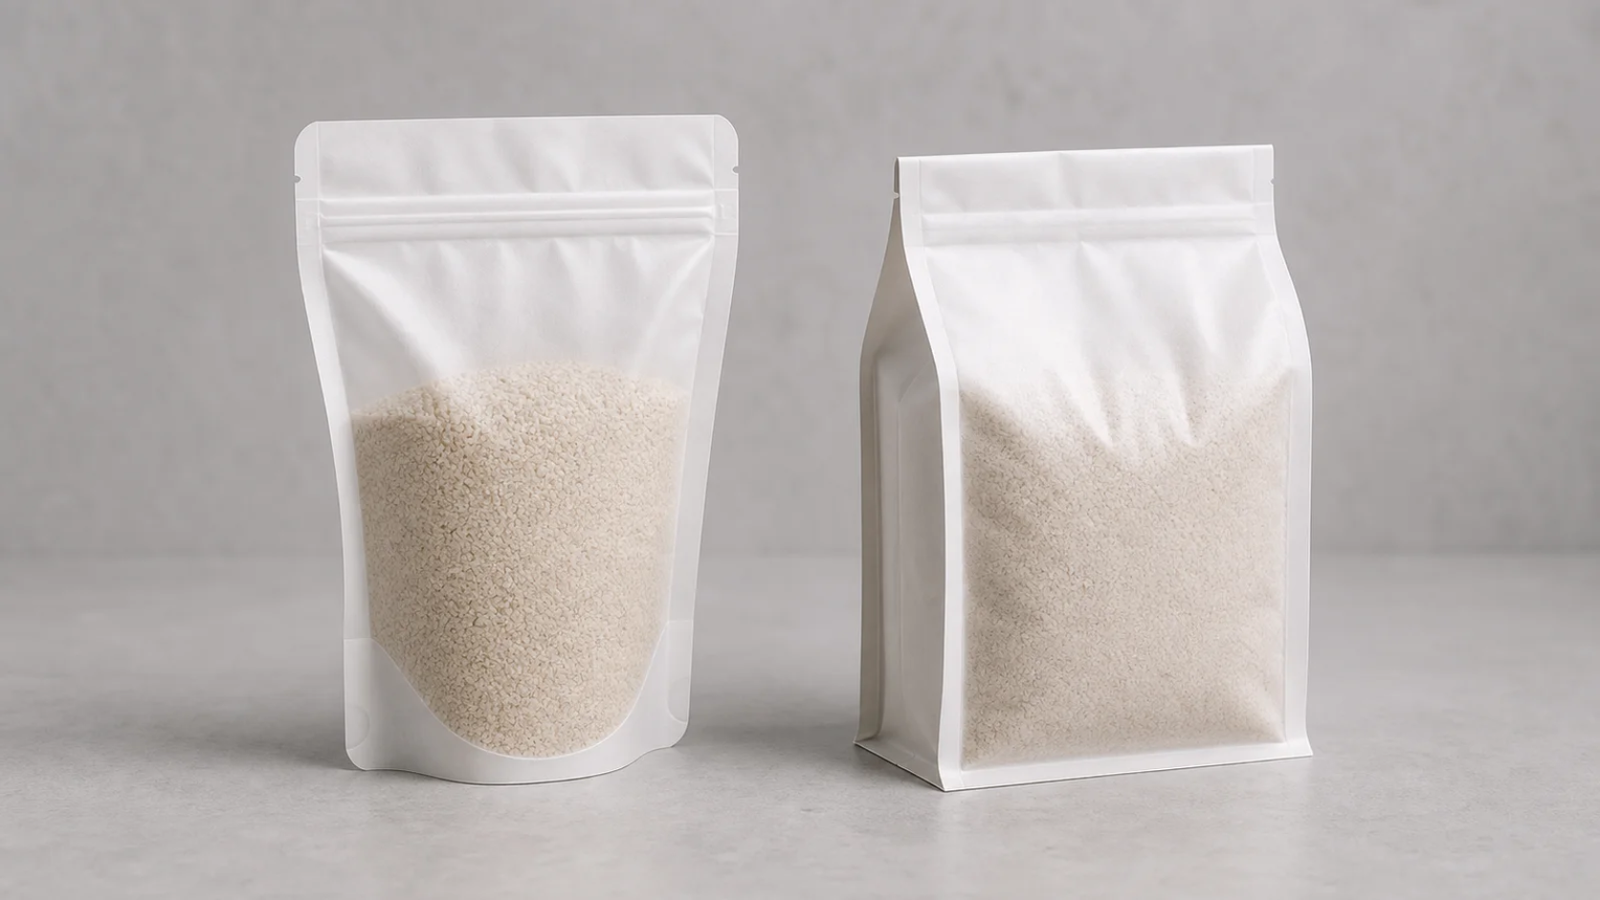
A stand-up pouch uses an expanding Doyen or plow bottom gusset. A flat bottom pouch combines a box-style base with two vertical side gussets, giving it a broader footprint, more defined edges and five principal printable faces.

The base determines how the pouch expands, carries the product and stands after filling. A Doyen bottom uses a curved, sealed gusset. A plow bottom also opens into a standing base and may be considered when the contents place more load on the lower panels.
A flat bottom pouch is constructed more like a flexible carton. Its front, back, two side gussets and bottom create a rectangular body. It is still flexible, but the wider base and defined side panels can improve shelf blocking for suitable products.
| Buyer decision | Stand-up pouch | Flat bottom pouch |
|---|---|---|
| Base design | Doyen or plow bottom gusset | Box-style base with vertical side gussets |
| Primary print areas | Front and back | Front, back, two sides and bottom |
| Typical filled shape | Rounded or tapered | More rectangular and carton-like |
| Main structural benefit | Efficient upright presentation | Broader footprint and defined side panels |
| Converting consideration | Generally simpler | More panel and web coordination may be required |
Understanding bottom gusset geometry1 is more useful than comparing empty pouch photos. The empty formats can look similar when laid flat but behave differently once product loads the base and side panels.
I would settle the geometry before discussing a zipper, valve, window or finish. Those features cannot correct an unsuitable footprint. Review a correctly filled sample from the front, side and bottom, then confirm that it stands without support from neighboring packs.
Which Pouch Format Fits Your Product Weight and Bulk Density?
Choose the format using net weight, bulk density and filled-product behavior together. Light or moderate fills may suit a Doyen stand-up pouch, while dense products or larger fills may need a plow bottom or the broader support of a flat bottom pouch.

Net weight states how much product enters the pouch. Bulk density indicates how much space that weight occupies. Particle shape, trapped air and settling then influence the finished height, width and load on the base.
Useful selection inputs include:
- Net weight for every SKU
- Product form, such as powder, beans, granules, kibble or irregular pieces
- Approximate bulk density or a representative product sample
- Expected settling during filling, transport and storage
- Required headspace and filled height
- Target shelf footprint and facing width
A documented bulk density measurement2 gives the converter a better starting point than a product name alone. It should still be supported by a sample when particle shape or trapped air affects filling behavior.
Can equal weights require different pouch sizes?
For example: Equal net weight, different pouch volume. Consider a dense powder and irregular snacks sold at the same net weight. The powder occupies a compact volume and concentrates its load near the base. The snacks need more internal volume because of their shape and trapped air. Applying one pouch size to both products would produce different headspace, proportions and shelf behavior. This is a teaching example, not a customer case.
A Doyen bottom may work where the fill is lighter and the resulting pouch remains stable. A plow bottom can be considered as base loading increases. Flat bottom construction becomes relevant when the product needs a broader footprint and more side support.
These are selection directions, not fixed weight rules. I would assess prototypes filled with the actual product or a representative substitute. Check tipping, lower-panel bulging, settling, headspace and fit within the intended shelf or shipping arrangement.
When Does a Flat Bottom Pouch Justify Its Higher Pack Cost?
A flat bottom pouch is justified when its shelf blocking, five-face presentation or carton-like shape serves a defined commercial or functional purpose. If those benefits do not improve positioning, information delivery or handling, a stand-up pouch may be the more efficient choice.

Flat bottom pouches involve more complex converting and may use more film than comparable stand-up formats. The decision should therefore start with the job the additional structure must perform, not with a general preference for premium-looking packaging.
The format may earn its place when the pack needs to:
- Form tidy, rectangular facings in specialty or premium retail
- Give a dense or heavier product a broader standing base
- Carry organized information across front, back and side panels
- Present a carton-like shape without using a rigid box
- Support a price position in which packaging presentation influences perceived value
For a mainstream snack, ingredient or refill product, those benefits may not offset the added cost. A well-proportioned stand-up pouch can still provide a strong front-facing panel, familiar convenience features and a modern appearance with a simpler construction.
Flexible packaging material efficiency3 should be compared using equivalent specifications. A low quotation for one format and a high quotation for another may reflect different thicknesses, barrier structures, print coverage or accessories rather than geometry alone.
Ask each supplier to quote the same fill quantity, material requirement, feature set, print scope and order quantity. The quotation should identify the assumed structure, total thickness, number of webs, surface finish and included tooling or setup. This separates the cost of the pouch format from unrelated specification differences.
I would approve the additional spend only when the wider footprint, extra panels or structured presentation has a clear role in product protection, handling or retail positioning.
Should You Specify a Simple, Mono-Material or Multi-Web Construction?
Choose the material construction from product protection, sealing, converting and end-of-life priorities, not pouch shape alone. A stand-up pouch may allow a simpler structure, while a flat bottom pouch can combine different webs across its front, back, sides and base.

Format describes the pouch geometry; it does not fully define the laminate. The structure must still protect the product, convert consistently, run through filling equipment and form an appropriate seal.
| Construction direction | What it can provide | What the buyer must define |
|---|---|---|
| Conventional laminated structure | Combined print, barrier and sealing functions | Product compatibility, barrier, thickness and seal layer |
| Mono-material direction | A structure based mainly on one material family where technically feasible | Required barrier, stiffness, sealing response and fit for use |
| Multi-web construction | Different functional or visual panels | Web compatibility, registration, panel structure and artwork control |
| Clear and opaque combination | Product visibility with opaque branding panels | Window position, light exposure and barrier continuity |
OTR is oxygen transmission rate. WVTR is water vapor transmission rate. If either property matters, specify the target together with the measurement method, temperature and humidity. Oxygen transmission rate test conditions4 matter because results produced under different conditions are not directly interchangeable.
Total thickness is also insufficient by itself. Structures with the same nominal thickness can have different stiffness, barrier and sealing behavior because their layers perform different functions.
What changes when a clear window is added?
For example: Clear window and barrier trade-off. A buyer adds a clear side window to show the product. The clear web may not provide the same protection strategy as the original opaque panel. The supplier must review light exposure, barrier continuity and compatibility between webs rather than treating the window as an artwork-only change. This is a teaching example, not a customer case.
I would ask which layer supplies the barrier, which layer contacts the product and which layer forms the seal. A mono-material direction or clear panel should only proceed after the complete structure still meets the agreed fit-for-use requirements.
How Much Printable Area Does Your Packaging Actually Need?
Choose printable area by assigning required information to specific panels. Stand-up pouches concentrate communication on the front and back, while flat bottom pouches add two side gussets and a bottom panel. Extra surfaces are useful only when each has a defined role.

Five printable faces do not automatically produce a clearer package. More panels create more places to organize information, but they also add artwork decisions and increase the risk that important content moves onto a folded, curved or poorly viewed surface.
Start with a panel map:
- Front: brand, product name, variant and primary visual hierarchy
- Back: description, instructions and required product information
- First side gusset: origin, product range or supporting brand content
- Second side gusset: brewing, preparation or feeding instructions
- Bottom: secondary information that does not require immediate visibility
The exact allocation depends on the product and labeling review. What matters is assigning every content group before the format and dieline are approved.
Will side-panel artwork remain visible after filling?
Not necessarily. Flexible packaging artwork distortion5 can occur when a flat panel curves, folds or moves toward an edge after the product fills the pouch. Side gussets may appear wider or narrower depending on fill volume and settling. Keep critical text within the converter's recommended print areas and away from folds, seals and expected distortion zones.
Stand-up pouches are often sufficient when rapid front-facing recognition is the priority. Flat bottom pouches make sense when the side panels have real jobs rather than serving as unused decoration.
I recommend reviewing a full-size artwork mockup on a filled white sample. Examine it upright, by hand and from normal shelf distance. This shows whether the extra panels improve navigation or simply scatter information around the pack.
Why Can a Weight-Only Pouch Specification Fail?
A weight-only specification fails because equal product weights can occupy different volumes and load the pouch differently. Reliable sizing also requires bulk density, product form, headspace, expected filled dimensions, bottom geometry and the shelf footprint the completed package must maintain.

Writing “pouch for 500 g” or another nominal weight does not define a three-dimensional package. It leaves the supplier to estimate product volume, headspace and filled proportions, which can lead to an unstable pouch or unnecessary material.
The equal-weight example above illustrates the problem. Powder may fit into a short volume while loading the lower panels heavily. Irregular snacks can require a taller or wider pouch because of trapped air and the spaces between pieces. Their declared weights match, but their gusset depth and filled dimensions do not.
What should a capacity specification include?
- Product form and approximate bulk density
- Target fill level and required headspace
- Expected settling after filling and transport
- Empty width, height and gusset dimensions
- Expected filled width, depth and height
- Required shelf facing and base footprint
- Preferred Doyen, plow or flat bottom construction
- Acceptance criteria for standing, bulging and opening behavior
Filled package dimensional testing6 should be agreed before approval. Measure the pouch after filling and any defined settling period, using the intended product and quantity. Empty-pouch dimensions remain important for converting and equipment fit, but they answer a different question.
A narrow pouch may look efficient on a drawing yet tip when dense contents push into the lower panels. A flat bottom pouch may solve that problem, but specifying one without confirming the need for its broader base can add avoidable cost.
Approve both the empty drawing and the filled presentation. Check the sample on a level surface, handle it as a buyer would and confirm that it still fits its shelf and shipping constraints.
Will the Pouch Work with Your Filling and Sealing Process?
Compatibility depends on the fill method, usable opening, feature positions, contamination risk and clean top-seal area. Confirm these conditions with the co-packer or equipment team, then approve the pouch through representative filling and sealing checks rather than from an empty sample.

A zipper, tear notch, valve or hang hole can be added to either format, but every feature takes up space. A pouch may have enough theoretical volume while leaving too little usable opening for the filling chute or too little clean material for the final seal.
Use this approval checklist before production:
- Identify whether filling is manual, semi-automatic or automatic.
- Confirm how the pouch is opened, presented and supported.
- Measure the usable opening between zipper ends or side seals.
- Check that the filling chute clears the zipper and pouch walls.
- Define headspace above the intended fill level.
- Keep powder, crumbs, oil and product pieces out of the seal area.
- Confirm final top-seal width and location.
- Check tear notch, valve and hang-hole positions against the equipment.
- Assess closure access, opening behavior, seal appearance and shelf stance on filled samples.
The heat seal operating window7 is the workable range of equipment conditions within which the structure can form an acceptable seal. It should be reviewed with the actual laminate, sealing equipment, dwell time, pressure and line speed. A single temperature value does not describe the complete process.
Why does zipper clearance matter?
For example: Zipper and top-seal clearance. A pouch appears large enough by its outside dimensions. After filling, however, the product sits too close to the zipper and leaves insufficient clean material for the final top seal. Powder in this area may interfere with sealing, while an overfilled pouch may be difficult to position consistently. This is a teaching example, not a customer case.
Possible corrections include increasing pouch height, reducing fill level, adjusting feature positions or changing the filling setup. The right correction should be confirmed through a representative line trial.
What Information Should Your Pouch RFQ Include?
A useful pouch RFQ defines the product, fill quantity, density, dimensions, format, material needs, features, artwork scope and filling conditions. It should also state how the filled pouch must stand, open, fit the shelf and pass the buyer's approval checks.

A supplier can quote from a size and quantity, but the result may not represent the package the product needs. Strong flexible packaging RFQ requirements8 separate fixed specifications from preferences and identify where the supplier may recommend alternatives.
Product and filled-pack details
- Product type, form and relevant sensitivities
- Net fill weight and approximate bulk density
- Availability of representative product samples
- Target fill level, headspace and settling behavior
- Desired filled width, depth, height and shelf footprint
- Primary retail, e-commerce or distribution conditions
Pouch construction
- Stand-up, Doyen, plow bottom or flat bottom preference
- Empty dimensions and the method used to measure them
- Proposed material structure and total thickness
- Required barrier targets and OTR or WVTR test conditions where relevant
- Opaque, clear or mixed-web panel requirements
- Surface finish, printed faces and number of artwork versions
Features and filling conditions
- Zipper, tear notch, valve or hang hole
- Manual, semi-automatic or automatic filling method
- Required filling-opening clearance
- Final top-seal area and known equipment restrictions
- Requested sealing guidance or operating window
- Order quantity, delivery schedule and packing requirements
Approval checklist
- Empty dimensions match the approved drawing.
- The actual product fits with suitable headspace.
- The pouch stands and presents as intended after settling.
- Features remain accessible and correctly positioned.
- Filling and sealing trials show acceptable equipment fit.
- Agreed fit-for-use checks reflect the intended product and supply chain.
Ask the supplier to list every quotation assumption. Estimated density, dimensions, thickness, barrier or feature positions should be visible before samples are ordered. That makes competing proposals easier to compare on the same technical basis.
For a recommendation, sample plan or quotation, send the product type, fill weight, bulk density, target pouch size, material or barrier need, required features, artwork quantity, order volume and filling method. Include a product sample when settling or density is difficult to describe.
References
-
Doyen vs. K-Bottom vs. Plow Bottom: What's right for you? - The Plow Bottom gusset, characterized by its flat, rectangular design, offers versatility and practicality for stand-up pouch packaging. With crisp, straight ... ↩
-
Bulk Density - an overview | ScienceDirect Topics - Bulk density is the mass per unit volume of a loose powder bed. The unit volume includes the spaces between the particles, and the envelope volumes of the ... ↩
-
Flexible Pouches 101: Popular Materials and Their Applications - This blog will explore some commonly used flexible pouch materials, their unique properties, and their ideal applications. ↩
-
ASTM D3985 Oxygen Transmission Rate (OTR) Testing Guide for ... - ASTM D3985 measures oxygen transmission rate through plastic films and packaging materials. Key parameters include temperature, relative humidity, oxygen ... ↩
-
Packaging Design Preparation Guide: Art Files, Die-Lines & Bleed - Stand-up pouches expand, cartons fold, gussets distort, and surfaces curve once filled. Design preparation must account for how the artwork ... ↩
-
Testing Methods for Flexible Packaging - Bizongo - Dimension Testing. The flexible packaging testing for dimensions checks the size of the packaging before and after it is filled. Flexible ... ↩
-
Heat sealing evaluation and runnability issues of flexible paper ... - The seal temperature used ranged from 100 to 130 °C with a dwell time of 1 to 100000 s, to characterize the development of interfacial strength. Mueller et al. ↩
-
Custom Flexible Packaging: The Complete RFQ Checklist (2026) - A professional checklist graphic summarizing key technical specifications required for a custom flexible packaging RFQ,. A bad packaging ... ↩